UA offers a full complement of charting capabilities, as described in the Charting chapter of this manual. The basic functions explained here will get you acquainted with UA's charts.
You'll note a new toolbar displays along with your chart. These, along with the "New Chart" icon on the main toolbar are used for charting.

From the main Unfair Advantage Toolbar:
 Create a New Chart (not listed in your portfolio). Click this button and enter the selections for creating a new chart.
From the separate toolbar above the chart:
 Zoom Out - This feature compresses the spacing of the price bars, contracting the data into a smaller, more compact form. Very contracted charts may have considerable overlap, which tends to obscure pricing details and studies. Check the calendar at the bottom of the chart to see the date range currently displayed and use the scroll bar to see the rest of the chart.
 Zoom In - This reverses the above process, allowing you to see more details on your chart. Each time you click the button, the chart itself expands, but the time period visible on the screen gets smaller.
 Tracker - Click this button to add a crosshair pointer to your screen. Use your mouse to position the pointer anywhere on the chart. A data window showing complete numerical market data for the corresponding day also displays. Click the button again to remove the tracker and data window.
 Indicators - Click this button to add studies to your chart through your customized Study Toolbar, which is essentially a highly customizable "Favorites" menu. A few standard studies are included initially, but you may add more and/or edit those shown. You can even add your own custom studies to this list to apply to your charts.
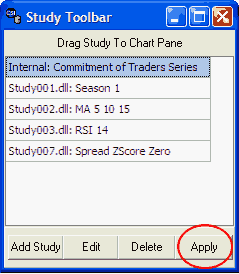
To apply a study to your chart, click on the study of your choice from the Study Toolbar and then click [Apply]. You will be asked which pane should hold the study, and you may select any one of the four panes offered. These are ordered from top to bottom, with 1 representing the top pane that also holds your bar chart. You may superimpose the study on your bar chart by selecting pane 1, or select and empty pane to display the study alone. Alternately, you may "drag" the study name to the pane of your choice and "drop" it there. The chart will be redrawn with the study in place.
See the Study Toolbar chapter for more information on applying, editing and adding studies.
 Chart Tools - Click this button to add a Trendline, Annotation, Rectangle, Ellipse, Gann Fan (with or without reflection) or to Zoom By Box or Unzoom Previous Zoom.
Study Quick Pick Menu:
Just below the charting toolbar is a text box that initially displays *No Indicator*. Click the arrow at the right side of that box to drop down an extensive menu of studies, as shown below.
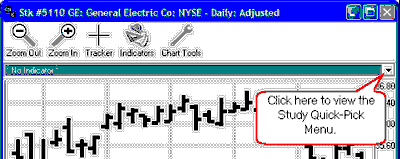
As you can see, the Study Quick-Pick Menu offers an extensive list of technical indicators that can be added to your chart instantly. Just click on your choice. For more on indicators, see the Interpreted Studies chapter.

Additional Chart Manipulations
 Chart/Table - From the tabs at the bottom of the screen, select your choice of chart or numerical table to display data. The table gives access to UA's data editor for manually entering price changes or additions. See the Viewing Table Data topic for more information.
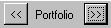 Contract Selector - Use these buttons to scroll through charts of the items in the selected portfolio. Click the right button (below chart) to display the next chart on the portfolio list. Click the left button to go back. This feature is only available when charts are selected from a portfolio.
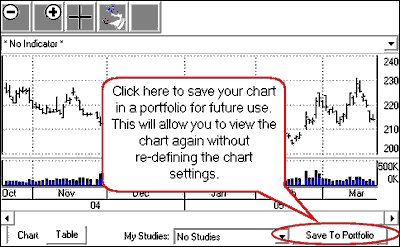 Save to Portfolio - This button appears in the lower right corner of your charting screen (in place of the Contract Selector (Portfolio button, above) when a new chart is created, rather than selected from a portfolio. Click this button to save your complete current chart settings in any specified portfolio so that you can recall the chart without having to re-create it from scratch. A dialog displays allowing you to select the desired format(s) for export files, if desired, and allowing you to select an existing portfolio or create a new one for file placement. These are explained fully in the Your Portfolio chapter.
Tool Bars
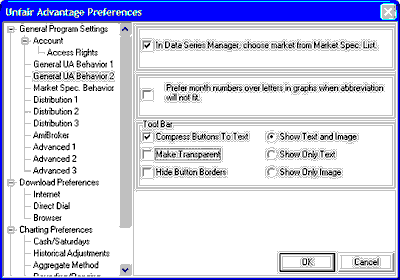
The presentation of buttons for controlling your database and charting functions can impact the space available for charting. The examples above show both text and a graphic image on each button. You can reduce the size of the buttons by compressing them and by using only text or an image instead of both. These are controlled on the "General UA Behavior 2" screen (shown below) found on UA Preferences. The final chart example in this topic uses only compressed text on the buttons, reflecting the most efficient choices for maximizing charting space.
Windows
You can add charts to your screen by selecting them from the Portfolio list and clicking [Chart] or by creating them through the "New Chart" feature. When multiple charts have been loaded, click on the "Window" menu at the top of the Unfair Advantage screen for a list of choices for display. This allows you to select the chart to view, rearrange charts or to display them as tiled or cascaded. See the Adjusting Screens and Windows topic to learn more.
Changing the Portfolio Panel/Chart Window size
Here's graphic showing some examples of chart manipulation:
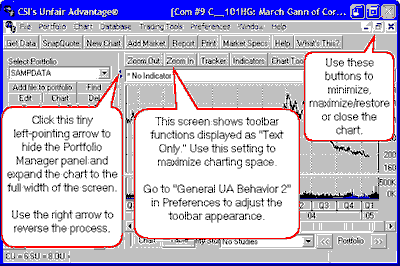
When the Portfolio Manager panel is minimized (either by dragging the right edge to the left margin of the screen or by clicking the left-pointing arrow at the right boundary) the charting window can almost fill the entire screen. You can restore the Portfolio Manager panel by clicking the right-pointing arrow at the left edge of your chart.
Now that you have a good understanding of basic charting, let's explore some other ways of viewing data, starting with a daily report.