Market Data Unfair Advantage Posting Status Robert 2016

Support Blog

The support blog is a guide for default set ups, fixes and recommendations for Unfair Advantage and other Trading Programs.

How do I uninstall Unfair Advantage?

All the steps are vital for a clean reinstallation of Unfair Advantage.

  1. Click the Windows ‘Start’ button and navigate to ‘Control Panel’.
    Click ‘Add or Remove Programs’ on Win XP, or ‘Programs and Features’ on Win Vista/7.
  2. Select ‘CSI’s Unfair Advantage’ from the list and hit the ‘Remove’ button.

    Windows Vista/7 has the ‘Uninstall’ button above the list.

  3. The uninstall process will start.
    After a few seconds you will get a ‘CSI Unfair Advantage Uninstall’ pop-up window.
    Check the ‘Delete Database Files’ box and click the ‘Yes’ button to proceed.
  4. The process will continue to uninstall the software.
  5. To backup your previous portfolios and settings proceed with this Step. If you do not want to back-up your portfolios proceed with Step 6.

    Navigate to the Windows ‘Start’ button and click ‘My Computer’ on Win XP, or ‘Computer’ on Win Vista/7.
    Click your local hard drive C:\ (or the drive you installed Unfair Advantage) and click the sub-folder ‘Archives’ (full path C:\ua\Archives).
    Right click the ‘portfile.adm’ file and choose ‘Copy’ from the menu.
    You can now choose any destination. Right click and choose ‘Paste’ from the menu.

  6. To completely remove Unfair Advantage from you hard drive you will need to remove the C:\ua folder.
    Navigete to the Windows ‘Start’ button and click ‘My Computer’ on Win XP, or ‘Computer’ on Win Vista/7.
    Click your local hard drive C:\ (or the drive you installed Unfair Advantage), right click the ‘ua’ folder (full path C:\ua) and choose ‘Delete’ from the menu.
  7. You successfully removed Unfair Advantage from your hard drive.

How do I find my user ID and user Number in Unfair Advantage?

There are two ways of finding/inserting the Unfair Advantage User ID and User Number.

  1. Click the icon “UA EzDownloader” on your desktop.
    [If you do not have the icon on your desktop click the START button | navigate to (ALL) PROGRAMS | choose the CSI Unfair Advantage folder | click UA EzDownloader].
  2. Click the icon “Launch UA” on your desktop.
    [If you do not have the icon on your desktop click the START button | navigate to (ALL) PROGRAMS | choose the CSI Unfair Advantage folder | click Launch UA].

    Navigate to PREFERENCES along the top.
    Select ‘ACCOUNT’ from the list.

How to download by using the browser?

A new Firewall/Anti-Virus upgrade/installation could blocks Unfair Advantage’s from getting its updates.
If you are not able to configure your Firewall/Anti-Virus to work with Unfair Advantage, there is another way of getting the data.

  1. Click ‘LAUNCH UA’ on your desktop.
  2. Select ‘PREFERENCES’ from the main menu.
  3. Select ‘DOWNLOAD PREFERENCES’ from the menu, and choose ‘BROWSER’ from the Download Method drop down menu.
  4. Click the “OK” button.
  5. Start a daily distribution by clicking the icon ‘DOWNLOAD DATA’.
  6. Click the ‘OK’ button.
  7. Click the ‘SAVE’ button.
  8. Choose the Unfair Advantage folder (default C:\ua).
  9. Click the ‘SAVE’ button.
  10. After the download is complete return to the Unfair Advantage program and click the ‘OK’ button.
  11. You should see Unfair Advantage updating the data.

How to create a historical spread sheet?

  1. Go to your Desktop and double click the icon “Launch UA”.
  2. Select “PORTFOLIO” from the main menu bar.
  3. Select “CREATE NEW PORTFOLIO” from the “PORTFOLIO” menu.
  4. Type in a name for your portfolio (i.e. Spread) and click the “OK” button.
  5. Choose your symbols (i.e C2 for Corn combined session, and W2 for Wheat combined session).
  6. Select the tab “Back Adjusting” or “Nth Nearest” (i.e. Back Adjusting) and choose your settings.
  7. Click the “OK” button.
  8. Click the “YES” button to create the hard disk files.
  9. Open each symbol as a chart.
  10. Select “CHART” from the main menu.
  11. Select “OVERLAY DATA CHART” from the “CHART” menu.
  12. Select “CHART” from the main menu again.
  13. Select “STUDY TOOLBAR” from the “CHART” menu.
  14. Click the “ADD STUDY” button in the Study Toolbar window.
  15. Select “SPREAD” from the drop down menu and click the “OK” button.
  16. Drag the study over to the chart.

How do I find the online manual for the latest Unfair Advantage version?

Unfortunately we don’t have a manual for the latest Unfair Advantage version.
But fortunately we didn’t change the Unfair Advantage core too much and matches the older Unfair Advantage version.
Some design changes were made in the newer version.

Please use the link below to get our online manual and learn more about our Unfair Advantage software.
http://csidata.com/custserv/onlinehelp/OnlineManual/

Using the Expiration Editor

With the latest Unfair Advantage build .112 we introduce the Expiration Editor.
This will display the expiration if they exist in the factsheet. In case they don’t exist, use the Expiration Date Editor to calculate the expiration dates.

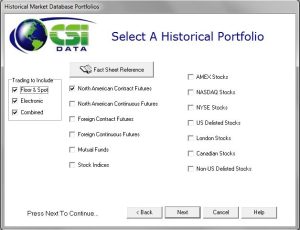
To be able to see the Expiration Editor you will need to enter the ‘Selecting Data Series’ window.
You can either create a new portfolio, or add/edit a symbol to receive the ‘Selecting Data Series’ screen.
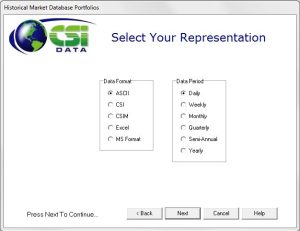
Click the ‘Advanced’ button to expand the ‘Selecting Data Series’ window.

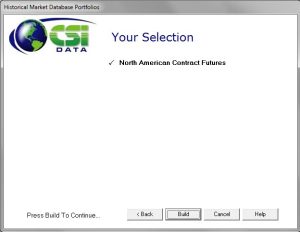
After typing in a symbol into the symbol field, you will be able to see the Expiry Dates.
In case the Expiry Dates field remains blank, than we don’t have expiration dates for that specific symbol.

Use the ‘Contract Expiry’ button to calculate the expiration dates.
Click the ‘Add’ button in the Contract Expiration Rules section and enter the information to calculate the expiration dates. Click the ‘OK’ button to save the changes.

The new symbol will appear in the list.
Also, you are able to add contract rolls to symbols in the Override Contract Roll by Date section.

Note: The Expiration Editor applies only to the C++ Back Adjuster. If you are using the FORTRAN Back Adjuster you will not be able to use the functions above. To change to the C++ Back Adjuster, select PORTFOLIO from the main menu, click EDIT PORTFOLIO settings, choose the portfolio you wish to convert to C++ and click the ‘OK’ button. Click the ‘Back Adjusting’ tab, and check the ‘Use only the C++ Back Adjuster’ box. Click the ‘OK’ button to save the changes.

Using the Symbol Linker

With the latest Unfair Advantage build .112 we introduce the Symbol Linker.
You can now link the history from two symbols together into one chart.

The Symbol Linker can be accessed by navigating to the icon called ‘Symbol Link’ along the top of the Unfair Advantage software.

(Note: Make sure you are running Unfair Advantage version 2.10.7 build .112.)

In the ‘Market Symbol Link Utility’ window you can set up the connection between two symbols.

To the upper left of the window, type in the symbol, the start and end date, and the available contracts will fill in.

To the upper right of the window, type in the symbol, choose the start date, end date, and select the contract.

When done setting up the symbols click the ‘Add’ button to save the settings. The contract will appear in the list below.

To chart the linked symbols, highlight the linked symbols from the list, and click the ‘Chart button.
To close the ‘Market Symbol Link Utitily’ click the ‘OK’ button.

How to Multi-Select Contracts and Markets?

For easier use of the Unfair Advantage software we added the multi-select option.

In the ‘Selecting Data Series’ window use the Futures tab, type in a symbol and click the [X] in the description line. All futures contracts will be checked at once. Click the OK button and the futures contracts will be placed into your portfolio.

In the ‘Selecting Data Series’ window use the Options tab, type in a symbol and click the [X] in the description line. All option contracts will be checked at once. Click the OK button and the option contracts will be placed into your portfolio.

This feature works in the factsheet/Market Specs as well. Sort by Exchange, Group, Market Type, etc. and click the [X] in the description line.

All symbols will be checked at once. Click the OK button to return to the ‘Selecting Data Series’ window. After confirming the action with the OK button all symbols will be placed into your portfolio.

How to set up VantagePoint to have CSI as your data vendor?

Step 1

Download UA from our website
Scroll down to “Unfair Advantage for VantagePoint Users”

Click on the “Unfair Advantage Package for Vantage Point Users” EXE (which is circled in the image).

Step 2

  • Download the file. It is a very big file so it will take a while.
  • When finished downloading, double click on the file to install the Unfair Advantage Program.
  • When installing you will have a chance to select a Vantage Point Portfolio.
  • Most likely you are using VP 8.4, not sure if that one is on the list yet but if it is not don’t worry because you can still get it from within the Unfair Advantage program (directions follow).
  • During the installation DO NOT change any settings, just leave the default settings. Click NEXT, NEXT, … INSTALL.
  • At the end of installation you will be prompted to enter your 3 letter user ID and 5 digit # which will come in a separate e-mail from our billing department.
  • From there just follow the prompts.
If there was not a choice of an 8.4 VP portfolio:
  • Open the Unfair Advantage program
  • Choose Portfolio
  • Download Portfolio
  • Vantage Point 8.4
Setting up Vantage Point 8.4 to use CSI as your data vendor:
  1. Open the Vantage Point Program
  2. Make sure all charts and portfolios are CLOSED
  3. In top left corner of program, click on FILE
  4. Click on CONFIGURE
  5. Select Commodity Systems, Inc. as Data Vendor
  6. Indicate the following in the space provided
    C:\XXXXYYY\CSI 84
    NOTE THERE IS A SPACE BETWEEN CSI & 84
  7. Apply and close window

If you have any questions or problems, call CSI at (561) 392-8663 M-F 8:30am to 9:00pm

How to increase the number of IFG contracts?

Increase the number of IFG contract for one or more symbols.

  1. Double click ‘Launch UA’ on your Windows Desktop.
  2. Click the ‘Select Portfolio’ drop down box and select the portfolio you want to make changes to.
  3. Click the ‘Delivery’ description field to sort the contracts in alphabetical order. Look for the ‘NFG Several Nearest Futures’ contracts.
  4. Click on one of the contract month, highlight it, and right click the highlighted area. Choose ‘Edit File Settings’ from the menu.
  5. In the ‘Selecting Data Series’ window change the contracts field. In this example we changed it from five (5) to seven (7). Click the ‘OK’ button to save the changes.
  6. Back to the program interface the program will ask you if you wish to build the files to your hard drive. Click ‘Yes’.
  7. You’ll have to repeat the steps for each symbol.

Increase the number of IFG contracts on the entire portfolio.

  1. Double click ‘Launch UA’ on your Windows Desktop.
  2. Click the ‘Select Portfolio’ drop down box and select the portfolio you want to make changes to.
  3. Select ‘Portfolio’ from the main menu, and click ‘Select All’. Note: Your entire portfolio should be highlighted. Right click the highlighted area, and choose ‘Edit Portfolio Settings’.
  4. In the ‘Selecting Data Series’ window change the contracts field. In this example we changed it from five (5) to six (6). Click the ‘OK’ button to save the changes.
  5. Back to the program interface the program will ask you if you wish to build the files to your hard drive. Click ‘Yes’.